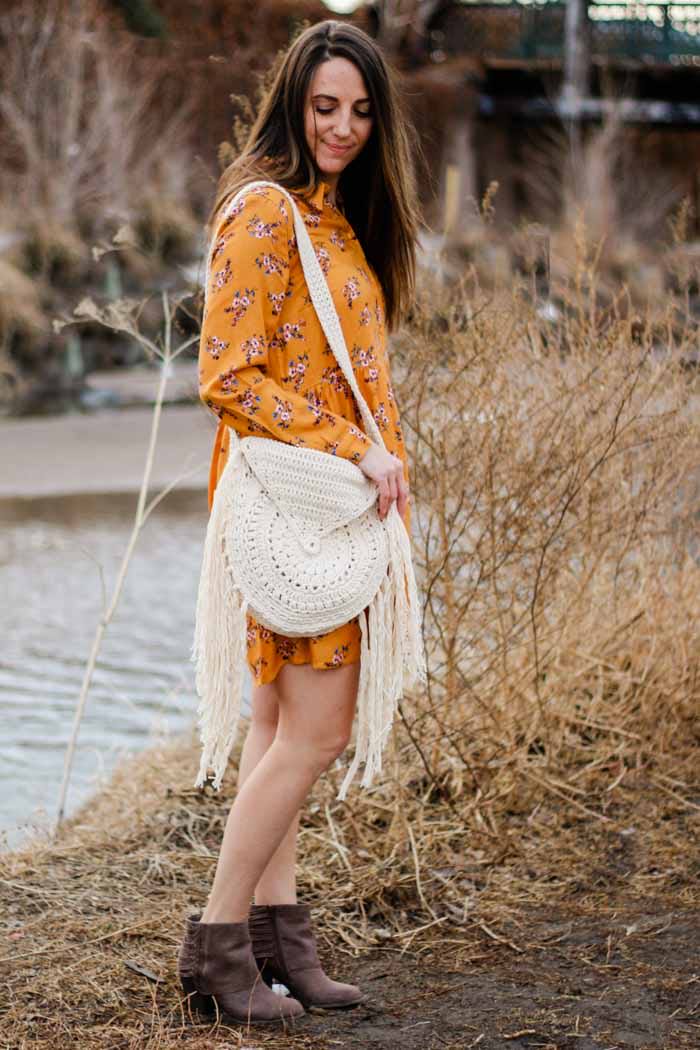
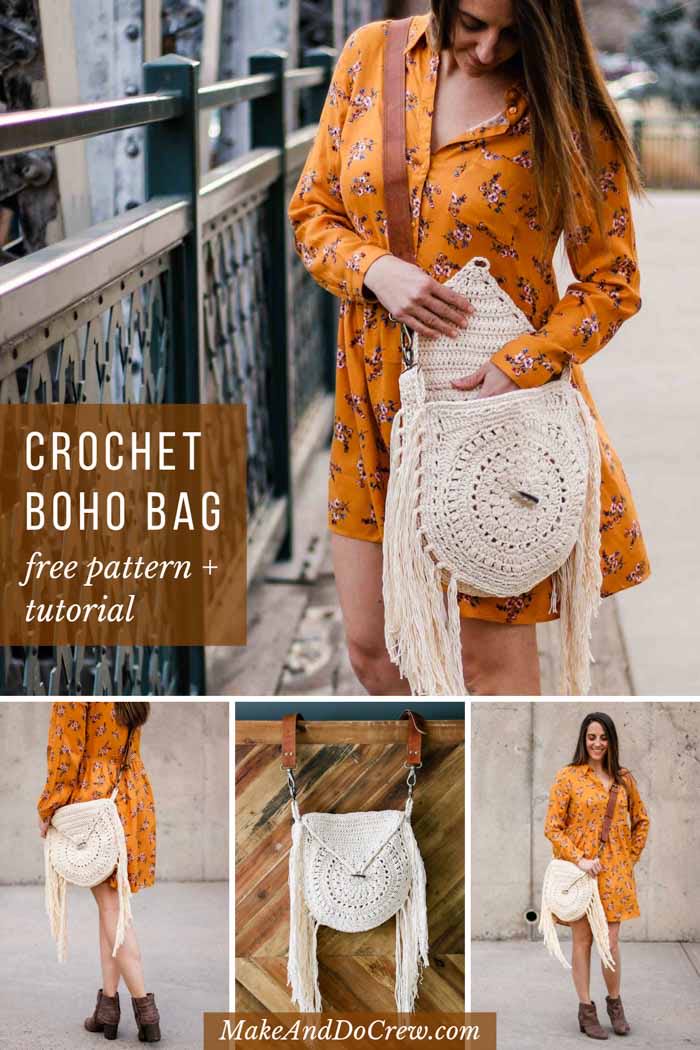
เป็นกระเป๋าโบฮีเมียนค่ะ
จากเว็ปนี่ค่ะ
https://makeanddocrew.com/fringed-crochet-bag-free-pattern/

ถ้าเข้าเว็ปไม่ได้ ช่วยแปลตามนี้ให้หน่อยค่ะ
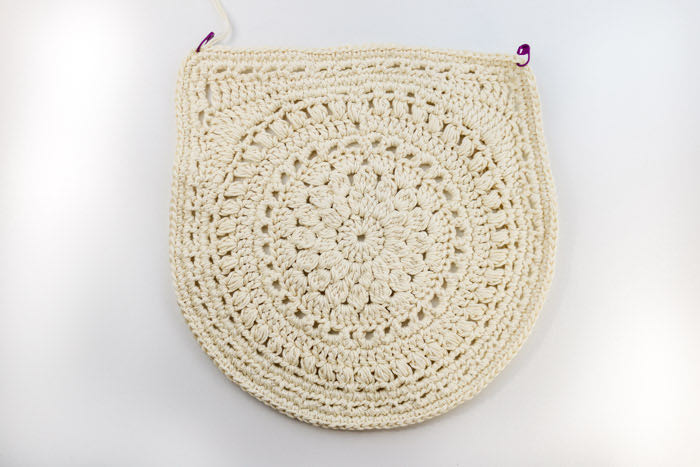
MAIN FRONT + BACK
Notes:
• Main circles are worked in the round. Each round is finished with a sl st to the first st of the round.
• Ch 3 at beginning of round always counts as 1 dc. Work these chs quite tightly so as to minimize the potential gap they can create in a round.
• See stitch chart in printable PDF for visual explanation of main circle pattern.
Make 2.
Foundation: Create a magic ring (or ch 5, sl st to join).
Round 1: Ch 3, 15 dc in ring, sl st to third ch from beginning of round to join. (16 sts)
Round 2: Ch 3, 2DcCl in top of ch-3, ch 1, [3DcCl in next dc, ch 1] 15 times, sl st to top of first cluster to join. (32 sts)
Round 3: Sl st into first ch-1sp, ch 3, 3DcCl in first ch-1 sp, ch 2, [4DcCl in next ch-1 sp, ch 2] 15 times, sl st to top of first cluster to join. (48 sts)
Round 4: Ch 3, [4 dc in next ch-2 sp] 15 times, 3 dc in last ch-2sp, sl st to top of beginning ch-3 to join. (64 sts)
Round 5: Sl st into first dc, [ch 4, sk 1 dc, sl st in third dc of same 4DcGroup, ch 4, sk 1 dc, sl st in first dc of next 4DcGroup] 15 times, ch 4, sk 1 dc, sl st into third dc of last 4DcGroup, ch 4, sk ch-3, sl st into sl st from beginning of round to join. (32 Ch4Loops)
Round 6: Ch 1, [3 sc in Ch4Loop, 2 sc in next Ch4Loop] 16 times, sl st to first sc of round to join. (80 sc)
Round 7: Ch 3, sk first sc, dc in each of next 8 sc, 2 dc in next sc, [dc in each of next 9 sc, 2 dc in next sc] 7 times. (88 dc)
Round 8: Ch 2, [yo, insert hook in top of ch-3 from previous round, yo and pull up a loop] twice, yo and pull through all 5 loops on hook (first Puff made), ch 2, sk 1 st, [Puff, ch 1, sk 1 st] 43 times, sl st to top of first Puff to join. (44 Puffs, 44 ch-1 sps)
Round 9: Ch 1, sc in top of first Puff, ch 2, sk ch-2 sp, [sc in top of next puff, ch 2, sk ch-2 sp] 43 times, sl st to first sc to join. (44 sc, 44 ch-2 sps)
Now we’ll begin squaring off the top corners. Place markers in the 4th, 10th, 36th and 42nd scs. These markers serve as a checkpoint that each corner has been placed in the correct stitches. For visual help with this section, reference stitch chart in printable PDF.
Round 10:
Beginning top edge:
Ch 1, sc in first sc, 2 sc in next ch-2 sp, [sc in next sc, 2 sc in next ch-2 sp] twice, (marker)…
Creating first corner:
…*Hdc in next sc, 2 hdc in next ch-2sp, dc in next sc, 2 dc in next ch-2sp, [tr in next sc, 3 tr in next ch-2sp] twice, dc in next sc, 2 dc in next ch-2sp, hdc in next sc, 2 hdc in next ch-2sp**, (marker)…
Continuing around side, bottom, side of bag:
…[Sc in next sc, 2 sc in next ch-2sp] 26 times, (marker)…
Creating second corner:
…Rep from * to **, (marker)…
Finishing top edge:
…[Sc in next sc, 2 sc in next ch-2 sp] 3 times, sl st to first sc of round to join. Fasten off. (136 sts)
Counting from first sc of previous round, place markers in the 20th st and the 117th st (which is the 20th stitch counting in the opposite direction). There are 38 sts in between the markers.
Attach yarn in 118th st (one st in from marked st). Row 11 is worked along top of bag between markers with RS facing. Do not remove these markers until directed to do so.
Row 11 (RS): Ch 4 (counts as first tr), tr in each of next 3 sts, dc in each of next 3 sts, hdc in each of next 3 sts, sc in each of next 18 sts, hdc in each of next 3 sts, dc in each of next 3 sts, tr in each of last 4 sts before marker; turn. (38 sts)
MAIN FRONT + BACK FINISHING BORDER
Notes:
• Rounds 1-3 are once again worked in the round. Round 1 is worked with WS facing.
Round 1 (WS):
Along top edge:
Ch 1, [sc in next st, ch 2, sk 2 sts] 12 times, sc in next st…
Continuing around sides and bottom of bag:
…ch 2, (PM in ch-sp), sc in side of ch-4, ch 2, sc in marked st, *ch 2, sk 2 sts, sc in next st; rep from * to next marked st, ch 2, sk marked st, sc in side of tr, ch 2, sc in side of tr once more, ch 2, (PM in ch-sp), sl st to first sc of round to join; turn. (49 sc, 49 ch-2 sps)
New markers placed in Round 1 now indicate top corners of purse. Markers from Round 10 may be removed.
Round 2 (RS): Ch 1, sc in first ch-2sp, (PM in sc), sc twice more in same sp, sc in next sc, *2 sc in next ch-2 sp, sc in next sc**; rep from * to marked sp, 3 sc in marked ch-2 sp, (PM in third sc), rep from * to ** to end of round, sl st to first sc of round to join; do not turn. (149 sts)
Round 3 (RS): Ch 1, 2 sc in marked st, (re-place marker in first sc), sc in each sc until second marker, 2 sc in marked st, (re-place marker in second sc), sc in each sc to end of round, sl st to first sc of round to join. (151 sc)
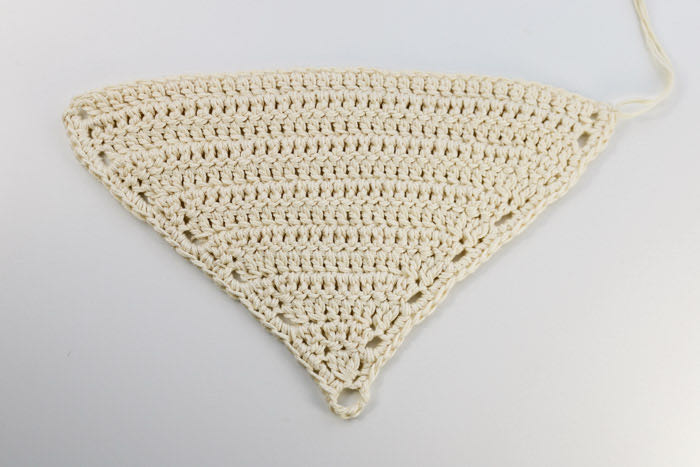
FRONT PURSE FLAP
Notes:
• Purse flap is crocheted separately and seamed to purse at the end.
• Ch 3 at beginning of row counts as first dc.
Make 1.
Foundation: Ch 41.
Row 1 (RS): Sk 2 ch, dc in each ch to end of row; turn. (39)
Rows 2-3: Ch 3, sk first dc, dc in each dc to end of row; turn. (39)
Row 4 (RS): Ch 3, sk first dc, [dc2tog over next 2 dc] twice, dc in each dc until 5 sts remain, [dc2tog over next 2 dc] twice, dc in last dc; turn. (35)
Rows 5-11: Rep Row 4.
Row 12 (WS): Ch 3, sk first dc, dc2tog over next 2 dc, dc in next dc, dc2tog over next 2 dc, dc in last dc; turn. (5)
Row 13 (RS): Ch 3, sk first dc, dc3tog over next 3 dc, dc in last dc; do not turn. (3)
Fasten off.
Right-handed crocheters: With RS of flap facing, attach yarn on the right-hand side of foundation ch.
Left-handed crocheters: With RS of flap facing, attach yarn on the left-hand side of foundation ch.
Border is worked around slanted edges of flap. To accommodate a different size button, adjust the number of chs in the middle of the border.
Border (RS): Ch 1, sc evenly along first slanted edge to corner (Row 13 of flap), ch 6, sc evenly along second slanted edge to end of Row 1 of flap. Fasten off leaving a 20” tail for seaming.
STRAPS
Notes:
• There are two options for finishing the bottom of the purse and creating a way to carry it.
Crochet a shorter strap that serves only as the purse bottom. Then add a leather shoulder strap.
Crochet a longer strap that serves as both the purse bottom as well as the shoulder strap. (See photo above.)
Shorter Purse Bottom – Option A:
The following instructions will create enough length for the leather strap to have a place to attach.
Recommended Foundation + Row 1: Fsc 100.
Alternative Foundation: Ch 101.
Alternative Row 1: Sk first ch, sc in each ch to end of row; turn. (100)
Rows 2-5 : Ch 1, sc in each sc; turn. (100)
Fasten off leaving a 12” tail for seaming.
Longer Purse Bottom + Strap – Option B:
The following instructions will create a strap that is approx. 67” long after blocking. For a longer or shorter strap, adjust number of chains in foundation.
Recommended Foundation + Row 1: Fsc 175.
Alternative Foundation: Ch 176.
Alternative Row 1: Sk first ch, sc in each ch to end of row; turn. (175)
Rows 2-5 : Ch 1, sc in each sc; turn. (175)
Fasten off leaving a 15” tail for seaming. Use tail and tapestry needle to seam short edges of strap together into a loop, taking care to ensure it’s not twisted.
FINISHING
Blocking:
Steam block main pieces using either a steamer or steam setting on iron. (Do not touch iron to yarn.) To block strap, stretch it a bit and pin to blocking board, then steam as described above. Blocking in stretched position will help ensure the crochet strap doesn’t stretch a lot with wear.
Joining Main Pieces:
With right sides of Main Front and Back facing out, pin purse front and back to crocheted strap/purse bottom as described below.
If using shorter purse bottom piece (Option A), position piece so that both the beginning and end of piece has an equal amount of overhang on each side of purse top, then pin to front and back pieces along 2 sides and bottom.
If using longer purse bottom + strap (Option B), position strap seam at bottom of purse then pin to front and back pieces along 2 sides and bottom.
Using a tapestry needle and existing yarn tails where possible, seam front of purse to purse bottom piece along pinned edges. Using a basting stitch, work underneath both strands of the sc “V”s of both the front and purse bottom piece/strap. Join back of purse to purse bottom piece in the same manner. (See photo above.)
If using strap Option A, before fastening off seaming thread, thread strap hardware onto overhanging pieces of purse bottom on either side of purse. Fold overhanging pieces toward inside of purse and seam so as to securely fasten.
Joining Purse Flap:
Choose a side of purse to designate as the front. With RS of purse flap facing out, pin flap to Purse Back along top edge. Using existing yarn tails if possible, seam flap to Purse Back. Using a basting stitch, work underneath the sc “V”s of both pieces to be joined.
ADDING A CLOSURE
To add a closure to top of purse choose to either crochet the button described below or find a wooden, bone or plastic button you prefer.
Make a Crochet Button:
Foundation Round: Ch 5, sl st to first ch to form a circle.
Round 1: Ch 1, 11 sc in circle, sl st to first sc to join. Fasten off leaving a 12” tail to sew button to purse.
Sew button of choice to front of purse.
ADDING FRINGE
Fringe pieces need to measure approx. 32” long before adding them to bag. To quickly cut fringe pieces of

ช่วยแปลแพทเทิร์นให้หน่อยค่ะ
จากเว็ปนี่ค่ะ https://makeanddocrew.com/fringed-crochet-bag-free-pattern/
ถ้าเข้าเว็ปไม่ได้ ช่วยแปลตามนี้ให้หน่อยค่ะ
MAIN FRONT + BACK
Notes:
• Main circles are worked in the round. Each round is finished with a sl st to the first st of the round.
• Ch 3 at beginning of round always counts as 1 dc. Work these chs quite tightly so as to minimize the potential gap they can create in a round.
• See stitch chart in printable PDF for visual explanation of main circle pattern.
Make 2.
Foundation: Create a magic ring (or ch 5, sl st to join).
Round 1: Ch 3, 15 dc in ring, sl st to third ch from beginning of round to join. (16 sts)
Round 2: Ch 3, 2DcCl in top of ch-3, ch 1, [3DcCl in next dc, ch 1] 15 times, sl st to top of first cluster to join. (32 sts)
Round 3: Sl st into first ch-1sp, ch 3, 3DcCl in first ch-1 sp, ch 2, [4DcCl in next ch-1 sp, ch 2] 15 times, sl st to top of first cluster to join. (48 sts)
Round 4: Ch 3, [4 dc in next ch-2 sp] 15 times, 3 dc in last ch-2sp, sl st to top of beginning ch-3 to join. (64 sts)
Round 5: Sl st into first dc, [ch 4, sk 1 dc, sl st in third dc of same 4DcGroup, ch 4, sk 1 dc, sl st in first dc of next 4DcGroup] 15 times, ch 4, sk 1 dc, sl st into third dc of last 4DcGroup, ch 4, sk ch-3, sl st into sl st from beginning of round to join. (32 Ch4Loops)
Round 6: Ch 1, [3 sc in Ch4Loop, 2 sc in next Ch4Loop] 16 times, sl st to first sc of round to join. (80 sc)
Round 7: Ch 3, sk first sc, dc in each of next 8 sc, 2 dc in next sc, [dc in each of next 9 sc, 2 dc in next sc] 7 times. (88 dc)
Round 8: Ch 2, [yo, insert hook in top of ch-3 from previous round, yo and pull up a loop] twice, yo and pull through all 5 loops on hook (first Puff made), ch 2, sk 1 st, [Puff, ch 1, sk 1 st] 43 times, sl st to top of first Puff to join. (44 Puffs, 44 ch-1 sps)
Round 9: Ch 1, sc in top of first Puff, ch 2, sk ch-2 sp, [sc in top of next puff, ch 2, sk ch-2 sp] 43 times, sl st to first sc to join. (44 sc, 44 ch-2 sps)
Now we’ll begin squaring off the top corners. Place markers in the 4th, 10th, 36th and 42nd scs. These markers serve as a checkpoint that each corner has been placed in the correct stitches. For visual help with this section, reference stitch chart in printable PDF.
Round 10:
Beginning top edge:
Ch 1, sc in first sc, 2 sc in next ch-2 sp, [sc in next sc, 2 sc in next ch-2 sp] twice, (marker)…
Creating first corner:
…*Hdc in next sc, 2 hdc in next ch-2sp, dc in next sc, 2 dc in next ch-2sp, [tr in next sc, 3 tr in next ch-2sp] twice, dc in next sc, 2 dc in next ch-2sp, hdc in next sc, 2 hdc in next ch-2sp**, (marker)…
Continuing around side, bottom, side of bag:
…[Sc in next sc, 2 sc in next ch-2sp] 26 times, (marker)…
Creating second corner:
…Rep from * to **, (marker)…
Finishing top edge:
…[Sc in next sc, 2 sc in next ch-2 sp] 3 times, sl st to first sc of round to join. Fasten off. (136 sts)
Counting from first sc of previous round, place markers in the 20th st and the 117th st (which is the 20th stitch counting in the opposite direction). There are 38 sts in between the markers.
Attach yarn in 118th st (one st in from marked st). Row 11 is worked along top of bag between markers with RS facing. Do not remove these markers until directed to do so.
Row 11 (RS): Ch 4 (counts as first tr), tr in each of next 3 sts, dc in each of next 3 sts, hdc in each of next 3 sts, sc in each of next 18 sts, hdc in each of next 3 sts, dc in each of next 3 sts, tr in each of last 4 sts before marker; turn. (38 sts)
MAIN FRONT + BACK FINISHING BORDER
Notes:
• Rounds 1-3 are once again worked in the round. Round 1 is worked with WS facing.
Round 1 (WS):
Along top edge:
Ch 1, [sc in next st, ch 2, sk 2 sts] 12 times, sc in next st…
Continuing around sides and bottom of bag:
…ch 2, (PM in ch-sp), sc in side of ch-4, ch 2, sc in marked st, *ch 2, sk 2 sts, sc in next st; rep from * to next marked st, ch 2, sk marked st, sc in side of tr, ch 2, sc in side of tr once more, ch 2, (PM in ch-sp), sl st to first sc of round to join; turn. (49 sc, 49 ch-2 sps)
New markers placed in Round 1 now indicate top corners of purse. Markers from Round 10 may be removed.
Round 2 (RS): Ch 1, sc in first ch-2sp, (PM in sc), sc twice more in same sp, sc in next sc, *2 sc in next ch-2 sp, sc in next sc**; rep from * to marked sp, 3 sc in marked ch-2 sp, (PM in third sc), rep from * to ** to end of round, sl st to first sc of round to join; do not turn. (149 sts)
Round 3 (RS): Ch 1, 2 sc in marked st, (re-place marker in first sc), sc in each sc until second marker, 2 sc in marked st, (re-place marker in second sc), sc in each sc to end of round, sl st to first sc of round to join. (151 sc)
FRONT PURSE FLAP
Notes:
• Purse flap is crocheted separately and seamed to purse at the end.
• Ch 3 at beginning of row counts as first dc.
Make 1.
Foundation: Ch 41.
Row 1 (RS): Sk 2 ch, dc in each ch to end of row; turn. (39)
Rows 2-3: Ch 3, sk first dc, dc in each dc to end of row; turn. (39)
Row 4 (RS): Ch 3, sk first dc, [dc2tog over next 2 dc] twice, dc in each dc until 5 sts remain, [dc2tog over next 2 dc] twice, dc in last dc; turn. (35)
Rows 5-11: Rep Row 4.
Row 12 (WS): Ch 3, sk first dc, dc2tog over next 2 dc, dc in next dc, dc2tog over next 2 dc, dc in last dc; turn. (5)
Row 13 (RS): Ch 3, sk first dc, dc3tog over next 3 dc, dc in last dc; do not turn. (3)
Fasten off.
Right-handed crocheters: With RS of flap facing, attach yarn on the right-hand side of foundation ch.
Left-handed crocheters: With RS of flap facing, attach yarn on the left-hand side of foundation ch.
Border is worked around slanted edges of flap. To accommodate a different size button, adjust the number of chs in the middle of the border.
Border (RS): Ch 1, sc evenly along first slanted edge to corner (Row 13 of flap), ch 6, sc evenly along second slanted edge to end of Row 1 of flap. Fasten off leaving a 20” tail for seaming.
STRAPS
Notes:
• There are two options for finishing the bottom of the purse and creating a way to carry it.
Crochet a shorter strap that serves only as the purse bottom. Then add a leather shoulder strap.
Crochet a longer strap that serves as both the purse bottom as well as the shoulder strap. (See photo above.)
Shorter Purse Bottom – Option A:
The following instructions will create enough length for the leather strap to have a place to attach.
Recommended Foundation + Row 1: Fsc 100.
Alternative Foundation: Ch 101.
Alternative Row 1: Sk first ch, sc in each ch to end of row; turn. (100)
Rows 2-5 : Ch 1, sc in each sc; turn. (100)
Fasten off leaving a 12” tail for seaming.
Longer Purse Bottom + Strap – Option B:
The following instructions will create a strap that is approx. 67” long after blocking. For a longer or shorter strap, adjust number of chains in foundation.
Recommended Foundation + Row 1: Fsc 175.
Alternative Foundation: Ch 176.
Alternative Row 1: Sk first ch, sc in each ch to end of row; turn. (175)
Rows 2-5 : Ch 1, sc in each sc; turn. (175)
Fasten off leaving a 15” tail for seaming. Use tail and tapestry needle to seam short edges of strap together into a loop, taking care to ensure it’s not twisted.
FINISHING
Blocking:
Steam block main pieces using either a steamer or steam setting on iron. (Do not touch iron to yarn.) To block strap, stretch it a bit and pin to blocking board, then steam as described above. Blocking in stretched position will help ensure the crochet strap doesn’t stretch a lot with wear.
Joining Main Pieces:
With right sides of Main Front and Back facing out, pin purse front and back to crocheted strap/purse bottom as described below.
If using shorter purse bottom piece (Option A), position piece so that both the beginning and end of piece has an equal amount of overhang on each side of purse top, then pin to front and back pieces along 2 sides and bottom.
If using longer purse bottom + strap (Option B), position strap seam at bottom of purse then pin to front and back pieces along 2 sides and bottom.
Using a tapestry needle and existing yarn tails where possible, seam front of purse to purse bottom piece along pinned edges. Using a basting stitch, work underneath both strands of the sc “V”s of both the front and purse bottom piece/strap. Join back of purse to purse bottom piece in the same manner. (See photo above.)
If using strap Option A, before fastening off seaming thread, thread strap hardware onto overhanging pieces of purse bottom on either side of purse. Fold overhanging pieces toward inside of purse and seam so as to securely fasten.
Joining Purse Flap:
Choose a side of purse to designate as the front. With RS of purse flap facing out, pin flap to Purse Back along top edge. Using existing yarn tails if possible, seam flap to Purse Back. Using a basting stitch, work underneath the sc “V”s of both pieces to be joined.
ADDING A CLOSURE
To add a closure to top of purse choose to either crochet the button described below or find a wooden, bone or plastic button you prefer.
Make a Crochet Button:
Foundation Round: Ch 5, sl st to first ch to form a circle.
Round 1: Ch 1, 11 sc in circle, sl st to first sc to join. Fasten off leaving a 12” tail to sew button to purse.
Sew button of choice to front of purse.
ADDING FRINGE
Fringe pieces need to measure approx. 32” long before adding them to bag. To quickly cut fringe pieces of