ปัญหา Battery
จริงๆแล้ว XperiaZ มีแบตและเวลาใช้งานไมเ่ป็นรอง Smartphone รุ่นอื่นแต่อย่างใด อย่าได้คิดไปเอง ดูได้จากผลการทดสอบด้านล่าง
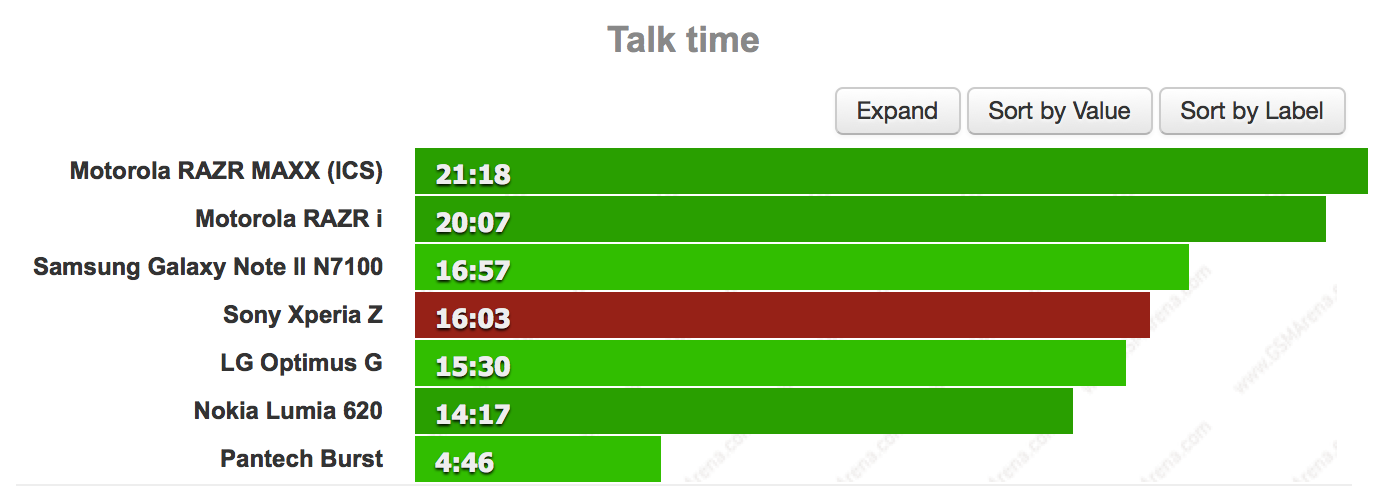
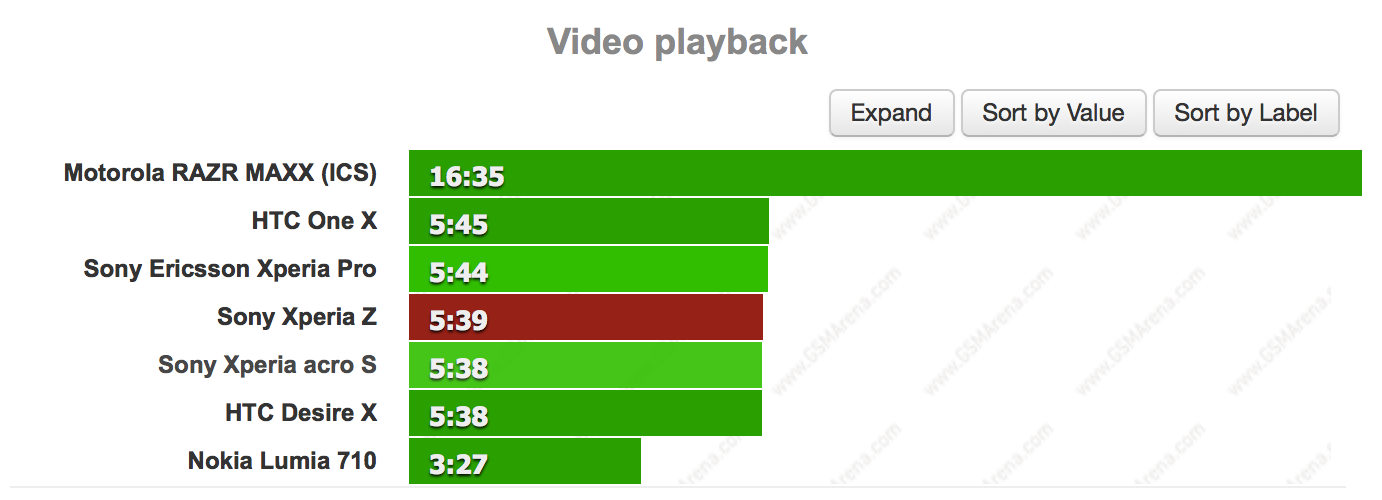
จาก:
http://blog.gsmarena.com/sony-xperia-z-battery-test-is-ready-here-come-the-scores/
ซึ่งวิธีการยืดอายุแบตเตอรี่ให้ใช้งานได้ตามที่มันควรจะเป็นนั้น ก็เป็นวิธีง่ายๆทั่วไป โดยให้เราทำการ
1.ชาร์จโดยการปิดเครื่อง (กรณีซื้อมาวันแรกให้ชาร์จทิ้งไว้ 20-24 ชั่วโมง)
2.อย่าใช้งานจนแบตเหลือ 0% เด็ดขาด
3.ใช้การชาร์จจาก usb port หรือ adapter 500mA แทน adapter ของมันเอง (1500mA) เพื่อให้การชาร์จเป็นไปอย่างช้าๆ
สาเหตุเพราะ Li-ion batteries like slow charging, slow draining. (
http://batteryuniversity.com/learn/article/charging_lithium_ion_batteries)
ปัญหาจอสีซีด ไม่สวย
มีข่าวลือออกมาว่าเครื่องของญี่ปุ่นนั้นได้จอสวยกว่ารุ่น International แต่ความจริงแล้วเป็นจอตัวเดียวกัน ซึ่งเราสามารถปรับค่าสีได้เองจาก Software แต่ทั้งนี้ต้องทำการ root เครื่องก่อน ลองดูรูปความแตกต่างระหว่างปรับสีแล้วกับยังไม่ปรับครับ
วิธีการ Calibrate หน้าจอ
1.ต้องทำการ root เครื่องก่อน
2.ดาวน์โหลดไฟล์
http://forum.xda-developers.com/attachment.php?attachmentid=1806725&d=1363348566
3.แตกไฟล์ zip ที่ดาวน์โหลดได้ออกมาแล้ว copy ไปไว้ใน XperiaZ
4.ลงโปรแกรมจัดการไฟล์บนเครื่อง XperiaZ แนะนำเป็น Solid Explorer
5.ในไฟล์ที่ดาวน์โหลดมา WB_bymw1kaduxx972fixe\system\app จะมีไฟล์ whitebalance.apk file. ให้ทำการ copy ไปไว้ที่ system\app folder แล้ว Set permissions เป็น rw-r-r.
6.ในไฟล์ที่ดาวน์โหลดมา WB_bymw1kaduxx972fixe\system\lib จะมีไฟล์ libdisplayservice.so file. ให้ทำการ copy ไปไว้ที่ system\lib folder แล้ว Set permissions เป็น rw-r-r.
7.ในไฟล์ที่ดาวน์โหลดมา WB_bymw1kaduxx972fixe\system\lib\hw จะมีไฟล์ libdisplay.default.so file. ให้ทำการ copy ไปไว้ที่ system\lib\hw folder แล้ว Set permissions เป็น rw-r-r.
8.ทำการ Reboot
9. ไปที่ Settings -> Display จะเจอเมนู White Balance setting เพิ่มเข้ามา
10.สามารถลองปรับค่าเองได้ หรือไม่ก็ตั้งค่าตามนี้เลยก็ได้ครับ
Saturation : 9
Hue: 220
brightness bar at 75%
เลือก adapt to lighting conditions
ยกเลิก bravia engine
วิธีการ Root XperiaZ
1.Increase screen timeout to 10 mins: Settings -> Display -> Sleep -> 10 mins
2.Enable USB debugging : Settings -> Developer options -> Enable and Settings -> Developer options -> USB Debugging 3.Enable install from "unknown sources": Settings -> Security -> Unknown source
4.Download the rooting toolkit package (
http://forum.xda-developers.com/attachment.php?attachmentid=1797479&d=1363027312) and save it on C:\
5.Wxit all adb requiring apps like PC Suite, PC Companion, Flashtool, etc as they will interfere with the rooting process
6.Extract the ENTIRE contents of the package (and not just one file) to some directory on c:\
7.Once you are ready with all the above connect phone to PC and execute "runme.bat" from the location where the entire contents are extracted
8.Press enter to start the process, as the device is detected the toolkit will start executing steps one by one
9.Keep watching the command prompt and wait for the following to come up "press the button to restore the data in your phone"
10.At this point look at the device screen, an app will start, select RESTORE data
11.Now u will get "if Restoring data is complete," in the command prompt
12.At this point open Phone & dial *#*#7378423#*#*
13.Select "Service tests" in your phone operation.
14.Select "Display" (screen will turn white), the toolkit will now start executing some commands
15.Now press power button to turn off screen wait for few seconds and press it power button again (repeat it a few time) till then keep observing the command prompt for outputs
16.You will see "transfer files to your phone part2", "installing busybox,su,Superuser,etc..." & finally "Cleaning up"
17.After that the device should automatically reboot
18.ทำการลบโฟลเดอร์ /data/usf เพื่อให้สามารถเปิดการทำงาน NFC ได้เหมือนเดิม
19.Reboot อีกหนึ่งครั้ง
20.Thats it device should now be rooted
แหล่งที่มาของข้อมูลทั้งหมดจาก
http://forum.xda-developers.com/showthread.php?t=2193055


[CR] XperiaZ ของคุณแบตหมดเร็ว จอซีด สีไม่สวย แก้เองได้ มาดูกัน
จริงๆแล้ว XperiaZ มีแบตและเวลาใช้งานไมเ่ป็นรอง Smartphone รุ่นอื่นแต่อย่างใด อย่าได้คิดไปเอง ดูได้จากผลการทดสอบด้านล่าง
จาก: http://blog.gsmarena.com/sony-xperia-z-battery-test-is-ready-here-come-the-scores/
ซึ่งวิธีการยืดอายุแบตเตอรี่ให้ใช้งานได้ตามที่มันควรจะเป็นนั้น ก็เป็นวิธีง่ายๆทั่วไป โดยให้เราทำการ
1.ชาร์จโดยการปิดเครื่อง (กรณีซื้อมาวันแรกให้ชาร์จทิ้งไว้ 20-24 ชั่วโมง)
2.อย่าใช้งานจนแบตเหลือ 0% เด็ดขาด
3.ใช้การชาร์จจาก usb port หรือ adapter 500mA แทน adapter ของมันเอง (1500mA) เพื่อให้การชาร์จเป็นไปอย่างช้าๆ
สาเหตุเพราะ Li-ion batteries like slow charging, slow draining. (http://batteryuniversity.com/learn/article/charging_lithium_ion_batteries)
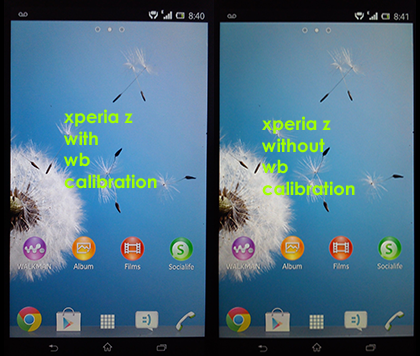
ปัญหาจอสีซีด ไม่สวย
มีข่าวลือออกมาว่าเครื่องของญี่ปุ่นนั้นได้จอสวยกว่ารุ่น International แต่ความจริงแล้วเป็นจอตัวเดียวกัน ซึ่งเราสามารถปรับค่าสีได้เองจาก Software แต่ทั้งนี้ต้องทำการ root เครื่องก่อน ลองดูรูปความแตกต่างระหว่างปรับสีแล้วกับยังไม่ปรับครับ
วิธีการ Calibrate หน้าจอ
1.ต้องทำการ root เครื่องก่อน
2.ดาวน์โหลดไฟล์ http://forum.xda-developers.com/attachment.php?attachmentid=1806725&d=1363348566
3.แตกไฟล์ zip ที่ดาวน์โหลดได้ออกมาแล้ว copy ไปไว้ใน XperiaZ
4.ลงโปรแกรมจัดการไฟล์บนเครื่อง XperiaZ แนะนำเป็น Solid Explorer
5.ในไฟล์ที่ดาวน์โหลดมา WB_bymw1kaduxx972fixe\system\app จะมีไฟล์ whitebalance.apk file. ให้ทำการ copy ไปไว้ที่ system\app folder แล้ว Set permissions เป็น rw-r-r.
6.ในไฟล์ที่ดาวน์โหลดมา WB_bymw1kaduxx972fixe\system\lib จะมีไฟล์ libdisplayservice.so file. ให้ทำการ copy ไปไว้ที่ system\lib folder แล้ว Set permissions เป็น rw-r-r.
7.ในไฟล์ที่ดาวน์โหลดมา WB_bymw1kaduxx972fixe\system\lib\hw จะมีไฟล์ libdisplay.default.so file. ให้ทำการ copy ไปไว้ที่ system\lib\hw folder แล้ว Set permissions เป็น rw-r-r.
8.ทำการ Reboot
9. ไปที่ Settings -> Display จะเจอเมนู White Balance setting เพิ่มเข้ามา
10.สามารถลองปรับค่าเองได้ หรือไม่ก็ตั้งค่าตามนี้เลยก็ได้ครับ
Saturation : 9
Hue: 220
brightness bar at 75%
เลือก adapt to lighting conditions
ยกเลิก bravia engine
วิธีการ Root XperiaZ
1.Increase screen timeout to 10 mins: Settings -> Display -> Sleep -> 10 mins
2.Enable USB debugging : Settings -> Developer options -> Enable and Settings -> Developer options -> USB Debugging 3.Enable install from "unknown sources": Settings -> Security -> Unknown source
4.Download the rooting toolkit package (http://forum.xda-developers.com/attachment.php?attachmentid=1797479&d=1363027312) and save it on C:\
5.Wxit all adb requiring apps like PC Suite, PC Companion, Flashtool, etc as they will interfere with the rooting process
6.Extract the ENTIRE contents of the package (and not just one file) to some directory on c:\
7.Once you are ready with all the above connect phone to PC and execute "runme.bat" from the location where the entire contents are extracted
8.Press enter to start the process, as the device is detected the toolkit will start executing steps one by one
9.Keep watching the command prompt and wait for the following to come up "press the button to restore the data in your phone"
10.At this point look at the device screen, an app will start, select RESTORE data
11.Now u will get "if Restoring data is complete," in the command prompt
12.At this point open Phone & dial *#*#7378423#*#*
13.Select "Service tests" in your phone operation.
14.Select "Display" (screen will turn white), the toolkit will now start executing some commands
15.Now press power button to turn off screen wait for few seconds and press it power button again (repeat it a few time) till then keep observing the command prompt for outputs
16.You will see "transfer files to your phone part2", "installing busybox,su,Superuser,etc..." & finally "Cleaning up"
17.After that the device should automatically reboot
18.ทำการลบโฟลเดอร์ /data/usf เพื่อให้สามารถเปิดการทำงาน NFC ได้เหมือนเดิม
19.Reboot อีกหนึ่งครั้ง
20.Thats it device should now be rooted
แหล่งที่มาของข้อมูลทั้งหมดจาก http://forum.xda-developers.com/showthread.php?t=2193055